Requirements
Follow the steps below to get set up to use the Spline iOS Runtime.1. Sign up for an Apple ID or join the Apple Developer Program
- To get started testing your app on your devices, you’ll need a free Apple ID.
- To publish your app on the App Store, you need to register with the Apple Developer Program.
2. Download and Install Xcode
The minimum Xcode version supported is 16.3
- Download the latest version of Xcode from the Mac App Store.
- Download the latest or beta versions of Xcode from the Apple Developer website.
Getting Started
Follow the steps below to get started using native 3D embeds on your Swift projects with Spline iOS Runtime.Platform Support
Spline is using the latest technologies to render 3D content on Apple devices.Language and Libraries Support
The Spline iOS Runtime uses SwiftUI and Swift.1. Adding the Spline iOS Runtime package to Xcode
To add via Swift Package Manager, in Xcode, select File > Add Package Dependency. In the package finder, select the search input and search using the full repository URL: https://github.com/splinetool/spline-ios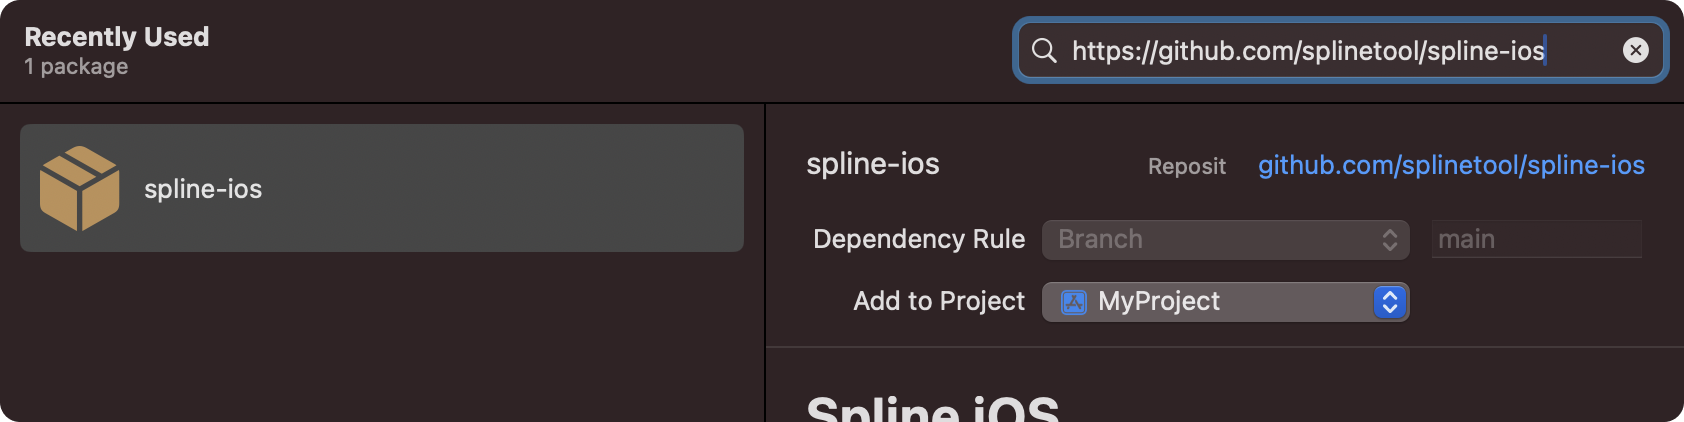 For more information, refer to Apple’s documentation on Adding package dependencies to your app
2. Importing the Spline iOS Runtime
To import the Spline iOS Runtime, make sure to always add the following code to the top of the file where Spline Runtime is used.3. Using the Spline iOS Runtime
3.1 Exporting from Spline
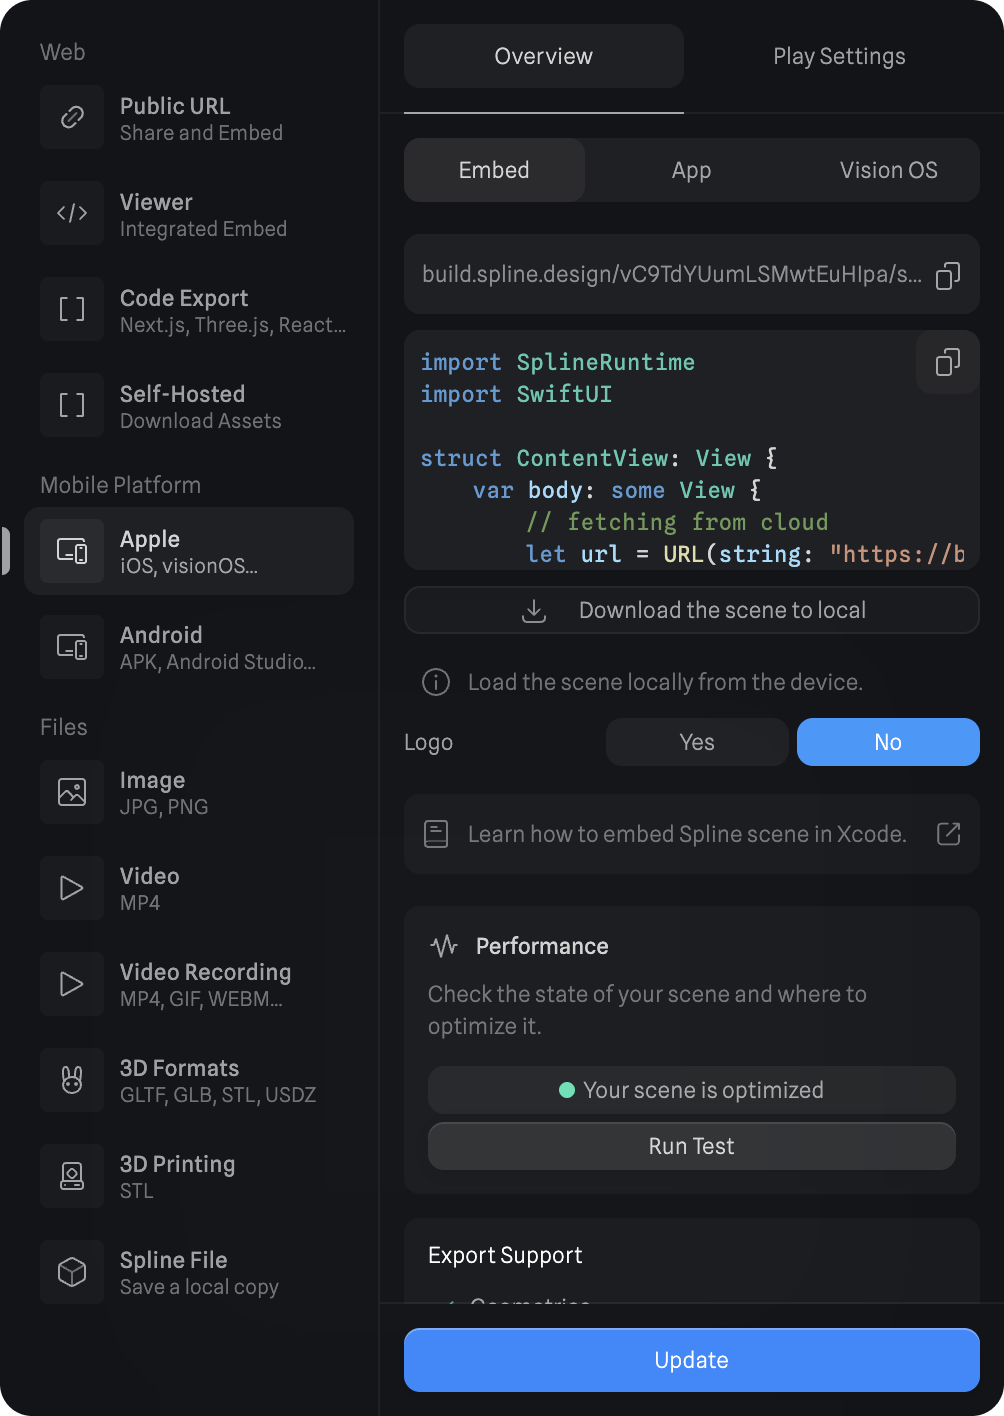
- From the top toolbar, press the
Exportbutton to open the export panel; - Under Mobile Platform select
Apple, and then theEmbedoption.
Update button to see all the updates made to the scene in your app.
To load your Spline scene locally, you can use the Download button below the code snippet.
To export for Apple Platforms, you’ll need an active Professional or Team subscription.
3.2 Integrating with your Xcode Project
From the Cloud
- Copy the code snippet and paste it into your
ContentViewSwift file;
- If not using local files, you can either keep the
fetching from localcode commented or remove it completely. - Use
.ignoresSafeArea(.all)if you want to show your experience on full-screen without the title bars. - When working with multiple cloud embeds, you can use the same code snippet and change the URL after the
string.
Locally
- Use the Download button below the code snippet to get a local copy of your Spline Scene as a
.splineswiftfile; - Import the
.splineswiftfile into your Xcode project’s root folder; - Copy the code snippet and paste it into the
ContentView; - Comment out the
fetching from cloudcode and uncomment the fetching from local code.
- When working with multiple local files, you can change the file name after
forResource. If the file name isscene.splineswiftthe code should look like:forResource: "scene"
4. Publishing and distributing your app
For more information on publishing to the App Store, refer to Apple’s documentation on Distributing your app for beta testing and releases.Download Xcode Demo
See how it works by downloading an Xcode demo project using cloud iOS embeds. File Get Started with the following steps:- On Xcode, go to File > Open and select the unzipped folder with your project;
- Select your build device – you can use your physical device (iPhone, iPad, Mac) or a simulator;
- Press ▶️ to build your project.
- You might need to go into
Signing & Capabilities, and underSigningadd your team manually. - Optionally, make sure to change the
Bundle Identifierto a unique one.
- Avatar 1: https://app.spline.design/file/a2770bba-eb91-4dce-9cec-44857322d7ad
- Avatar 2: https://app.spline.design/file/5f77c44e-411e-4420-93ac-438fe058c4ae
- Avatar 3:https://app.spline.design/file/30f38922-2b3f-488e-bc78-14dd25fd2ba1
Possible Warnings
When building your app, even if the app builds properly, there are a few errors that might be displayed on the embed. Refer below to see the warnings and their explanation.”Spline scene file is in an unknown format.”
”Spline scene file URL could not be reached.”
.splineswift file from the web. It can be because of an invalid URL, or just a non-functioning network connection.